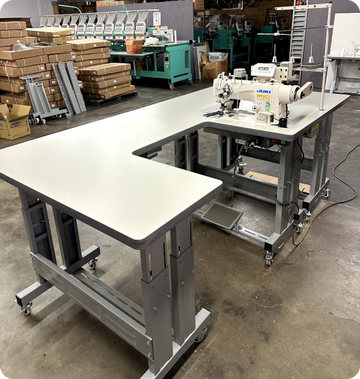

Step-by-step assembly of a double T-leg set from Prizzi Sewing.
Unpacking
Inside the box you'll find all the components needed to assemble that double T-style leg. You get a pair of the double upright supports, locking casters, foot pedal, foot pedal support rail, rear support rail, as well as a complete hardware package.

The caster wheels come pre-installed on this unit, but the key point is when you lock that lever, it secures not only the rotation of the wheel, but also the swivel motion as well, so that'll lock your machine right in place where you need it.

Inside the hardware pack, you'll find everything you need to assemble your legs, including these special brackets that will help lock in the height of your adjustable legs.
And then there's these special spacers. Because we're elevated on caster wheels, we need this spacer to drop the foot pedal support rail so it's in a nice, comfortable position for sewing.

The special rectangular nut will just lock into the bottom of your leg set to secure that lower rail.
Double T-Leg Set
Assembly is very similar on these, whether it's the double T-leg set like this or the single T-leg set. And the height range on this is from 29 inches all the way up to 38 inches, including those caster wheels.

There's a little bit of a shape to the bracket. Just have that follow the shape of the table and those go in on the inside and secure those brackets with these bolts from your hardware pack that already have a washer and lock washer installed.
Then add one more of those same bolts to the side, just to lock everything securely in place. And you can snug those up with a 13mm socket.
Then turn the legs upside down and go ahead and install this rear brace.

Foot Pedal
Use mounting brackets to secure the foot pedal to the lower rail, and for that we'll just use two standard length bolts from the hardware pack.

If you're not sure where to mount your foot pedal, there's a good bet that if you have a standard industrial sewing machine, it needs to be mounted just to the right of center.
Add that bracket at the back of the pedal with the two small bolts in the kit, and just leave them loose for now to allow some adjustment when it comes time to mount the motor.
Lower Rail
You'll need the two spacers, long bolts with washers, and these special rectangular nuts to mount the lower rail to your table.
With the table still upside down, add your spacer and the lower rail assembly, and you have to just kind of manipulate that square nut in there and slide it underneath, and then you can add the bolt from the top.
Position that forward or backward as desired and tighten it up with a 14mm socket. The nice thing about this design is that the rectangular nut can't move in there, so you don't have to fight it as you're securing the hardware.
Lock in your caster wheels before you flip it up to see how the overall assembly looks.
If the front casters aren't operating smoothly, it probably just means you don't have enough clearance for that caster wheel to come around, and you'll have to just slide that lower foot rail assembly back a little bit.
Table Top
We propose our customers a wide range of standard or a custom tops to outfit their new leg set.
You get a plywood core here sandwiched between 2 layers of MDF, and that's a perfect base for the laminate top. And the overall table thickness is a full 1 1/2 inches.

The big benefit of this drop treadle design compared to, say, a K-leg set that's been modified to receive caster wheels. The sewing position is much more natural.
So if you're looking to update your industrial sewing gear, whether that be table tops, leg sets, or just a new sewing machine, definitely check out Prizzi Sewing.
Overview and Assembling Guide on YouTube: https://youtu.be/GeauMZdG4WI