
How to assemble K-leg set for industrial sewing machines? That’s your step-by-step guide.
Unpacking
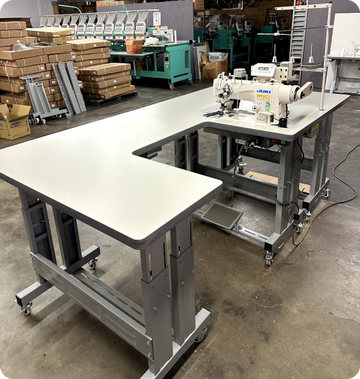
Your Prizzі leg set will come in a box like this. In the kit, you'll get two adjustable K-legs. Your complete hardware pack, a treadle rod and foot pedal.
Now, normally you'd get about a 38-inch rail for the treadle support rail and the back support rail.
This is a little smaller design. It's about 30 inches wide, and it makes a nice compact table.

Start with the bolt and lock washer. Add a flat washer and go in from the back. Then use this special washer that keeps the nut from turning. And finally add the nut from inside.
Adjust your height and get everything tightened up. You can secure that with either an adjustable wrench or a 22 millimeter socket. And that'll give you a height of about 29 inches.

Foot pedal
Next, locate all the parts that you'll need to assemble the foot pedal. It'll come with a couple brackets and a separately packaged hardware kit.
Roughly position your foot pedal. For example, it needs to be situated 11 inches from this right side, so it'll go right in here.
Make sure that as you position that foot pedal, the side with the holes faces the back of the machine that will actually receive a bracket that will help you attach your treadle rod up to the motor.
To attach those brackets, just drop the bolts in from the top side and then add a large flat washer and a nut on the bottom. Those large washers are important to help span any gap in these adjustable slots and keep everything secure.

Tight up one bracket, and you can push into that as you add the pedal and the second bracket. Add the bracket on the other side.
That can be touching because of that nylon spacer. But you don't want it compressed too much, it should have a nice easy action.
If it's a typical industrial sewing machine, there's a good chance the foot pedal needs to be located just to the right of center. And then add the bracket to the back of the foot pedal, but just leave the fasteners loose for now. That will give you some room to adjust things to align it with the treadle rod.
Rear rail
Then turn the leg set upside down and attach that rear rail. Secure that joint with bolts, flat washers and the included nuts.

Tools you'll need are 17 millimeter socket and open-ended wrench. And now you'll need some carriage bolts. With the table still upside down, they'll install from underneath like this with washer and nut.
Use a 17 millimeter socket to tighten that up, but do take note that this is adjustable.

Add the top
Whether it's a standard table or a custom one, all the belt slots and machine cutouts will be taken care of at Prizzi.
The tops are a full inch and a half thick and I like the construction details there. It's a plywood core sandwiched between 2 layers of MDF, which is a perfect substrate for the laminate top.

Even the bottom of the table is nicely sealed up, and that's important to keep it flat over time. Finally, just pre-drill some holes for the included wood screws to attach that top to your new leg set.

See, putting together these table leg sets was really easy.